Emergency Escalation
The Emergency Escalation feature provides greater visibility into a team's ability to respond to critical work orders. When high priority work orders are not addressed in an appropriate amount of time, the system can now alert those who are accountable for the well-being of the property to ensure that issues are addressed as soon as possible.
This is accomplished by specifying a list of users to notify and setting up the appropriate time intervals for the notifications to be sent. For example, if a high priority power outage is not addressed, you might first notify the crew manager, then the maintenance supervisor, all the way up to building manager. Once action is taken on the work order, for example, changing the status from Open to In Progress, emergency escalation notification stop.
Emergency escalation settings can be set on a per-property basis or for an entire region. Once the escalation settings have been established, you can then select which request priorities should use them.
The emergency escalation feature is configured based on the priority of a work order. It can be used in conjunction with the follow-up alerts feature, which is based on the work order type and subType.
In addition to establishing emergency escalation settings, certain additional configuration options must be set. For more information, see the Additional Required Configuration section at the bottom of this page.
To open the Emergency Escalation page:
-
Open the Administration Menu page.
-
Under the LOGBOOK ADMINISTRATION heading, click Emergency Escalation.
The Emergency Escalation menu item only appears if emergency escalation is enabled on the Logbook Configuration options page.
This pane allows you to define emergency escalation settings that apply to the entire installation. You cannot define these settings on a per-user, per-property, or per-region basis. To define global settings:
-
In the Maximum # of Alerts Per User field, select a value.
This setting establishes the maximum number of alerts that are sent to each user in the escalation list, but can be no higher than 10. If you do not select a value, no alerts are sent.
- Select the Flag Alerts as "High Importance" check box if you want the email alerts flagged as high priority in the user’s email application
Property settings allow you to define emergency escalations for a single property. If you want to define the same settings for all properties in a region, you can define region settings instead. To define settings for a property:
-
Click the Select Property Select link to select the property you want to define emergency escalation settings for.
-
In the Alert Frequency field, select a value indicating how often alerts should be sent.
-
Select the first user who will receive emergency escalation alerts.
-
Click the Select User Select link to locate the user you want to add to the escalation list.
Only users with security rights to the selected property are available.
-
In the Alert Start Count field, select which alert should be the first alert this user receives.
-
Click ADD.
If needed, you can remove a user from the list by clicking the red X next to his name.
-
Repeat step 3 to add more users to the escalation list.
-
Click UPDATE to save the escalation list for the property.
By carefully defining the frequency, a list of users and their alert start count, you can define a pattern to escalate an unhandled work order, up the chain of command.
Consider the following example:
If you set the following emergency escalation settings:
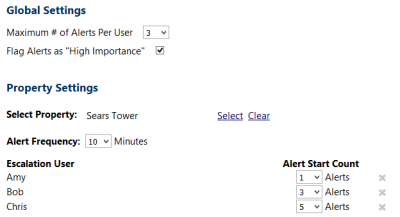
The following alerts will be sent:
-
At 10 minutes: Amy
-
At 20 minutes: Amy
-
At 30 minutes: Amy and Bob
-
At 40 minutes: Bob
-
At 50 minutes: Bob and Chris
-
At 60 minutes: Chris
-
At 70 minutes: Chris
-
At 80 minutes: no further alerts are sent
If work on the work request begins at any time, no further alerts are sent
You can create emergency escalation settings for all properties in an entire region by specifying the escalation settings and then electing to propagate them to an entire region.
If you create emergency escalation settings at the region level, and then propagate those settings, you overwrite any settings previously defined for any properties in that region.
If you want to define common settings for a region and then special settings for one or two properties within that region, define the region settings first, propagate them, and then create the special settings for individual properties.
To define settings for a region:
-
Click the Select Region Select link to select the region you want to define emergency escalation settings for.
-
In the Alert Frequency field, select a value indicating how often alerts should be sent.
-
Select the first user who will receive emergency escalation alerts.
-
Click the Select User Select link to locate the user you want to add to the escalation list.
Only users with security rights to the selected property are available.
-
In the Alert Start Count field, select which alert should be the first alert this user receives.
-
Click ADD.
If needed, you can remove a user from the list by clicking the red X next to his name.
-
Repeat step 3 to add more users to the escalation list.
-
Click PROPAGATE to propagate the emergency escalation settings to every property in the selected region
A dialog box opens asking you to confirm your choice.
-
Click UPDATE to propagate the settings
When complete, a message appears to indicate that the settings were successfully propagated.
To take advantage of he emergency escalation feature, the following configuration options must also be set.
-
On the Logbook Configuration Options page, in the Logbook Settings pane, the Emergency Escalation flag must be set to Yes.
-
On the Installation Options page, the content of the emergency escalation notification email messages must be defined by specifying values for the email subject and body.
-
On the Priority Lists page, the Emergency Escalation flag must be set to Yes to for every priority that require emergency escalation notifications to be sent.